Wedding Cake Pops! Tutorial
I was planning a dessert table for an upcoming wedding reception, and wanted to make some special treats to add to the selection. I started researching wedding dessert ideas, and found some great Cake Pop tutorials. I had seen cake pops in local stores before, but had never eaten one.
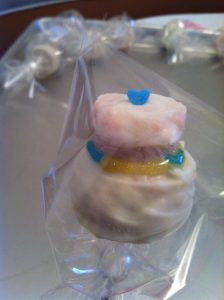
Then I stumbled upon a Wedding Cake Pop picture I thought was really cute, so I decided to give it a try! I found 3 tutorials that were very helpful, which I have listed at the bottom of this tutorial.
Once I had a general idea of how to make cake pops, and decided how I wanted to design mine, it was time to gather my supplies and get started!
Supplies Needed:
- One 9”x13” baking pan
- One baked 9” x 13” cake – you can use a boxed cake, I used a Duncan Hines Confetti Cake mix. If you have a special homemade recipe, go for it! Pick a flavor that bakes to the color you want for your theme.
- Large mixing bowl
- Large spoon
- Spatula – for spreading
- 8 oz. of Frosting – Color/Flavor that matches your cake color so it blends in and doesn’t change the color – canned or homemade, I made a buttercream frosting
- Round cookie cutters – I used a 1 ½” round diameter for the bottom layer of my “cake”, and 1” round diameter for the top layer.
- Wilton Candy Melts – This will be your cake “frosting”. The different colored Candy Melts like green, yellow, orange, pink, etc. are all vanilla flavored. There are also a variety of flavored Candy Melts, including cocoa and dark cocoa. They also have limited edition seasonal flavors that come out like Sugar Cookie and Candy Cane. I used the color white, since the wedding colors were blue and white, but you use the color that fits your theme best:


This a microwaveable tub Wilton has, but I found mixed reviews and have never used them.
- Paramount Crystals – these are used to thin out the Candy Melts so the coating dries to a thin, even coating on your Wedding Cake Pop.

- Wilton Sparkle Gel – This is a tube of frosting gel to use as a border between the cake layers, I used this gold translucent color:

- Decorative sprinkles – I found the perfect blue hearts (the wedding color) in a Wilton Sprinkle set like this:

- Lollipop sticks
- Cake Pop baggies – Wilton sells some that are 4 ¼” Wide x 7” Long. But you can find cheaper versions, just make sure they are at least 3” Wide x 5” long.
- Wired bag ties – I used gold colored ties

https://www.amazon.com/Baking-Addict-Metallic-Lollipop-Sticks/dp/B00777E0RS
- Cake Pop Stand or Styrofoam block – You will need something to set the cake pops in the final stages of making them so they can dry. Then you can use it to display your Wedding Cake Pops at your event. I bought the Wilton Pops Decorating Stand pictured below, but it wasn’t easy to assemble, and didn’t hold together very well. I wish I would have used a Styrofoam block. It would have been a lot easier, and cheaper. If you use a Styrofoam block, make sure and wrap it in plastic wrap or Press N’ Seal, so pieces of Styrofoam don’t attach to your cake pops.

- One small microwave-safe bowl/container – this container will be used to melt a small amount of Candy Melts in for fixing any cracks in your cake cut-outs, and for “gluing” your 2 layers of cake together.
One of these would be the perfect size to use :

- One medium-sized deep microwave-safe bowl/container – this container will be used to melt the Candy Melts in for dipping the cake pops to coat. You want to use something small, but deep enough to fit your Wedding Cake Pops when dipped, here are a few examples:
This medium-sized glass measuring cup would work perfect:

- Microwave oven – for melting your Candy Melts
- Toothpicks – for piercing any air bubbles and you can also use them to help guide coating occasionally
- Cookie sheet or plate lined with Waxed Paper – you’ll need something to place your cake cut-outs on as you make them, they will need to be placed in the refrigerator to cool, so choose something that will fit into your fridge 😊. The waxed paper is great to use because its clean, easy to transfer if needed and nothing sticks to it!
Instructions:
Finely crumble your cooled cake into a large mixing bowl. You can use a food processor, if you have one – pulse to a fine crumble and add to the large mixing bowl.
Clean out the 9” x 13” baking pan, line it with wax paper using a long enough piece to overlap the pan on both sides once fitted into the pan. This will make it easier to lift your cake mixture out once cooled. Set prepared pan aside.
Add 3 to 4 tablespoons of frosting to the crumbled cake and mix thoroughly with a spoon. You can use your hands to mix once you’ve done most of the mixing with a spoon. This makes it easier to mix thoroughly, and you can feel the consistency to test for firmness. What I mean by firmness is that you want the cake pops to hold together firmly, so they won’t fall off the stick, and can be dipped into the melted Candy Melts without falling apart. Also keep in mind that if you add too much frosting the cake will taste really sweet, and people may not want to eat them, flavor counts!
It’s a good idea to make a test cake-ball early on before adding more frosting. Make a ball about 1” in diameter to see how well the mixture holds together. Continue adding a tablespoon of frosting at a time, mixing thoroughly after adding each tablespoon, until you get your desired consistency.
Once your cake pop mixture is ready, spread the mixture into the prepared baking pan. Make sure to spread it evenly across, you want the top surface to be as flat and level as possible. A spatula works great for this step, if you have one.

If not, I think a good substitute would be to use a common household spatula like one of these:


Once you have the cake mixture spread evenly across the pan, cover the pan and place it in the refrigerator to chill for at least one hour.
Now is the perfect time to line your cookie sheet or plate with wax paper and set aside.
Once chilled, remove the pan from the refrigerator and place it on a counter top or table. If any areas of the pan is not covered with wax paper, slide a butter knife between the pan and the cake mixture to loosen before removing.
Once you are sure the sheet cake is fully detached from the pan it is ready to transfer the cake from the pan to a clean counter top or a flat cutting board long enough to hold the full sheet cake.
Carefully lift the waxed paper from the pan in one piece and place on the counter top or cutting board. If any cracks appear during the transfer, use a spatula or butter knife to carefully press back together. You are now ready to cut your cake layers!
You will need one round cake shape of 2 different sizes to make a 2-tiered Wedding Cake pop. Using the 1″ and 1 ½” round cookie cutters, cut equal amounts of each sized shape from your sheet cake.
**A good tip is to start at one corner of the cake sheet for your first cookie-cutter shape. Then, using the same size cookie cutter work across the sheet cake cutting your cake pieces. Try not to leave a gap between your shapes, so you use up all of the sheet cake**
Carefully remove the shapes from the cookie-cutters and place them onto the prepared plate. You are trying not to break or lose them lose their shape as you transfer them to the plate. If you do, no worries, just reshape as best as possible (I’ll tell you how to fix any minor cracks later).
Once you’ve cut all of the round shapes from the sheet, roll together any remaining cake mixture and spread out a strip of cake into the same thickness as the rounds you’ve already cut. Continue cutting out equal amounts of 1” and 1½” rounds until you’ve used up all of the cake mixture.
Cover the plates carefully and return to the refrigerator to cool. This would be your stopping point if you wanted to wait until the next day to complete the Wedding Cake Pops.
The next step is to “glue” the 1” rounds on top of the 1 ½” rounds to form the Wedding Cake shape. The Candy Melts will work as the “glue” to hold them together. You will also use this “glue” to fix any cracks you may still have in your dough, and again later to “glue” the lollypop sticks into the bottom of the cake pops.
You shouldn’t need too much Candy Melt “glue”, so place a small amount of the Candy Melts into a small microwave-safe container and follow any safety instructions that came with the Candy Melts. Then see my instructions below. I used this glass measuring cup, but it was about twice as many Candy Melts as I needed, and I made a lot of Wedding Cake Pops that day!

Since you are melting only a small amount of Candy Melts, you’ll have to be extra careful not to overheat them when melting. Microwave for 30 seconds at 50% power. This is important, because if you use too high of a heat the Candy Melts will become thick and clumpy. Stir well for one minute, even though they will still look pretty solid. Place back in the microwave and heat again for 30 seconds at 50% power. Remove and stir again for one minute. Check the temperature of the candy melts. They should be warm to the touch, but not hot, about 98 degrees is perfect (body temperature, if you don’t have a thermometer). If it feels any hotter, let it cool for a bit before stirring some more. Repeat until you get a pasty consistency, perfect for “gluing”.
First you will want to fill in any small cracks. Use a toothpick to scoop the melted coating between the cracks. Then, use your fingers to smooth the coating until completely sealing any cracks.
Next, using a small spoon, place a small amount of the melted Candy Melts to the bottom of a 1” cake cut-out and immediately place on top of a 1 ½” cake cut-out. Make sure to place it firmly in the center of the larger round, then use your finger to smooth any coating you see seep out between the cakes. Place the Wedding Cake shape back onto the prepared plate and continue until all of the Wedding Cake Pops have been “glued” together.

Insert a lollipop stick into each Wedding Cake Pop. Dip a lollipop stick about ½” into the Candy Melt, then insert the candy coated side of the stick about 1/2 way into the bottom of each Wedding Cake Pop:


Using your finger, smooth out any extra the Candy Melt at the bottom of the Wedding Cake Pop into a smooth layer around the lollipop stick and the bottom of the Wedding Cake.
Place back on to the prepared plate:

Once you have all of the lollipop sticks inserted, there is no need to cover them, you don’t want to risk loosening the stick from the cake. Carefully place the Wedding Cake Pops in the freezer for 20 minutes before dipping. Just enough time to melt your Candy Melts!
Preparing to Dip your Wedding Cake Pops:
Take the microwave-safe bowl you have for dipping, and fill it 2 – 3 inches full of Candy Melts. Place the bowl into the microwave. This time, since you are melting a larger amount of Candy Melts, they will take a little longer to melt. You have to melt them very slowly, so be patient!
Keep in mind that this time you will want to melt them to a thinner consistency, because this layer of Candy Melts will be the “icing” on your Wedding Cake Pops. You don’t want them to look thick or clumpy. And you want them to set up hard and shiny 😊 to get the Candy Melts to this consistency, you will need to use the Paramount Crystals this time.
As before, microwave at 50% power but this time for 1 minute. Stir well for one minute and place back in the microwave. Repeat at 50% power for 30 seconds, remove, stir one full minute. Start to test the heat of the Candy Melts before heating again. It should not be hot, but should be warm to the touch, body temperature, about 98 degrees. Any hotter, let it cool for a minute or two before mixing again.
At this point, start to add the Paramount crystals to thin Candy Melts. Refer to the package instructions. Just add a little at a time, stirring thoroughly between additions, until you have your desired consistency. Let set for 5 minutes before dipping.
I’ve read you should not use shortening, butter or oil to thin out the Candy Melts, because the candy will not harden at the right consistency for cake pops.
Before you start dipping:
*The temperature in your work area is important, you don’t want to work in a warm room or you may get cracks in your Cake Pops.
*Get your Cake Pop stand assembled ahead of time or f you’re using a Styrofoam block, make sure it is covered in plastic wrap or Press n’ Seal so the foam doesn’t break off onto your cake pop.
*Remember, the first few Wedding Cake Pops are your trial pops. After you make a few it will get easier and easier.
Time to Dip!
- Remove the Wedding Cake Pops from the freezer.
- Stir the candy coating thoroughly each time between dippings.
- Submerge the Wedding Cake Pop completely into the Candy Melts, until the coating meets the stick.
- Lift up and out, but let the Cake Pop hang upside down so all of the excess coating drips back into the bowl.
- Swirl gently, so the excess Candy Melt drip off evenly and you don’t get clumpy areas.
- Once the coating has dripped off evenly, gently bring the cake pop right-side-up.
- If you notice any coating pooling in one spot, gently hang the Cake Pop on its side and swirl in a circle to evenly spread the Candy Melt coating. Then bring upright again.
- Quickly look for any air bubbles. Air bubbles will cause cracks, so you will need to pop them before the coating hardens. Using a toothpick gently pop them one at a time, slowly tilting the cake pop back and forth to even out the coating where the bubble was, making it smooth again. Repeat with each bubbly, there usually aren’t too many bubbles to pop.
- Place the Wedding Cake Pop onto the Cake Pop stand or Styrofoam block to dry.
- Stir the Candy Melts, then repeat the dipping process above with the next Wedding Cake Pop
- If you start to run low on coating, add more Candy Melts and slowly melt in the microwave and stir as above, adding Paramount crystals as needed, until you have enough to start dipping again.
- Once you have dipped all of your Wedding Cake Pops, and they have dried completely it’s time to decorate them!
- One at a time, place a gold bead of Wilton Sparkle Gel between the 2 layers around the whole Wedding Cake Pop.
- Add some blue hearts into the gel, which will hold them in place.
- Top of the Wedding Cake Pops with a blue heart


- Once they are all completed and have had a chance to dry, it’s time to wrap them up.
- Place each Wedding Cake Pop into a cake pop baggie and tie at the bottom with a wire tie

- For safe-keeping, I would lay them out on a cookie sheet (see picture above) and transfer them to your event on this tray
- Display them at your event on your Cake Pop Stand or decorated Styrofoam block.
Unfortunately, as with many of my events, I was so busy setting up I forget to get pictures of my Wedding Cake Pops displayed at the wedding reception. But they looked really cute, and I got many compliments from the guests. And they tasted good!
Here are the websites I found to be very helpful in learning how to make cake pops. There are so many more, so have fun exploring. I hope this tutorial was helpful!
Happy Crafting 😊
Keepsake Crafter
The picture below is from Bakerella, which had the shape I liked, and ended up using for my Wedding Cake Pops:
https://www.bakerella.com/wedding-cake-pops/
Of course, Martha Stewart has an inspiration for everything!
Video Instructions from the Martha Stewart Show
This Diva has a recipe, and a cute video link at the bottom of her web page:
https://divascancook.com/how-to-make-cake-pops-easy-best/
The last tutorial I found very useful was from Duncan Hines, I mean, it’s Duncan Hines: